Virgin Media. Are incompetent bell-ends. Monkeys. Buffoons. Utter, utter retards.
Just a few feelings there for Virgin Media and their broadband and TV service, which, for me at least, is more often than not not working.
I have had 6 engineer visits in the last year because something or other has gone wrong, the latest being that to hook up some new customers to their service they unplugged mine to plug someone else in.
You may have experienced similar incompetence and are wondering what to do?
Well, Chief Bell-End at Virgin Media is a man called Neil Berkett. I've recently discovered him. Neil sits in a tree, tossing himself off whilst eating Wham bars and throwing money to Richard Branson in exchange for old tyres. My money!!
However, Neil occasionally swings down to his desk for a banana. When he does he can be contacted on email at neil.berkett@virginmedia.co.uk. Let him know of your angst and he will dispatch a usually pleasant and well-meaning individual to sort out your problems quicker than calling the "Customer Service" line (Right!!! let's get you some help" it intones).
Just a quick thank you to the chaps at Junk and Disorderly who came and removed a load of rubbish from the front of my house. Good work, fellas, although, appropriately, they have a rubbish website. They service North London at reasonable rates.
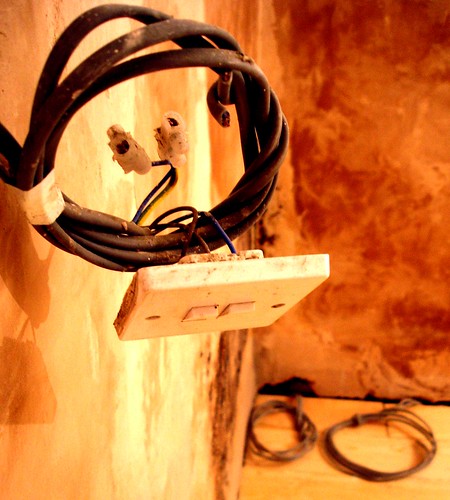
No, not a night wacked out on goofballs, rather an evening trying to isolate what was shorting my kitchen sockets circuit. All rather frustrating as I tried each bloody plug, socket, oven extractor fan, boiler etc etc, all the while my freezer defrosted and my girlfriend whined that there was no hot water for her to wax her lady bits.
In the end, i had to call an electrician who pinpointed the problem to the sparker thing on my hob - some moron had wired it into a socket which meant the wire burnt out.
A big thank you to Sean at S G Electrical who came out at very short notice, identified the problem and sorted it out in the time it took me to eat my weetabix. Nice price, too.
Identifying this sort of problem is difficult, let alone sorting it yourself. Leave electrics to the pros would be my advice.
If you need a good, reliable, friendly electrician in Crouch End, call Sean at S G Electrical on 020 8351 7769.
Improving your garden with even the smallest bit of landscaping can prove both valuable and enjoyable.
The beauty of making alterations to your garden is that you don't have to be as precise as you do when working indoors. You can balls it up a right treat and the worst that will happen is that it just adds some rustic charm to an outside space. Of course, you'll know that you didn't mean to build steps at 56 degree angles but you can palm it off as a design feature. Do this indoors and you look like a D.I.Y fool.
Garden Landscaping with Railway Sleepers
1) Planning, tools and materials.
The project I'm detailing here is the landscaping of my flower beds and lawn area with railway sleepers and some imaginative use of decking tiles.
My garden has a downward left to right slope to it (as you can seen from the picture) and was full of old building rubble from a recent conversion job in my flat (by cowboys, i might add).
The flower beds, as such, didn't really have any retaining walls, there was a horrible concrete wall to one side, and the shed area to the back of the garden was a mess of weeds, rubble and dead shrubs (yes, I put the shed up, and yes it's at a 56 degree angle as it was meant).
I'd decided that railway sleepers were a relatively inexpensive and easy way to add retaining walls to the flower bed, and could also be used to level out the garden without getting involved with bricks and mortar.
I planned the project out using Google Sketchup and worked out what tools and materials were needed. Google Sketchup is a free download and good for this sort of thing. It's a bit fiddly to use, though.
As with every project, planning is key, and even though I'm occasionally an advocate of the suck it and see DIY philosophy, no planning at all will lead to trouble.
i have listed the materials and tools that I used below, and were purchased from a range of stores:
Electric screwdriver (purchased from Amazon - see below)
Drill (purchased from Amazon - see below)
Protective glasses (purchased from Amazon - see below)
2) The donkey work
Quite a lot of earth and rubble had to be dug manually so I could level the land for the sleepers.
The path that Nipples the cat is walking is where the retaining wall was to be placed so this had to be as level as possible. So, I killed the cat, then sharp sand was laid down as a bed for the sleepers to go on.
The sleepers themselves are heavy and you could easily get away with just screwing them to each other and you'd be hard-pressed to budge them.
However, the retaining wall was to be 2 sleepers high so I decided to drill 6 holes in each of the bottom sleepers and then bang 50mm steel rods through them into the compacted soil beneath, using a hammer. Once the second sleeper was screwed on to the bottom one using the Timberlok screws, it was a pretty sturdy construction. . . . .
I'd planned to have a raised area accessible by a small step. The rubble and earth that I'd moved was used as the foundation for this raised area.....
The steps were cut to size using the chainsaw and bored into the floor as above and then secured to each other using the Timberlok screws.
WARNING: Chainsaws!!! Yup, you need to be careful. Wear some goggles, have a practice run on spare log or domestic pet, make sure it's well oiled and wear heavy protective boots and gloves. A useful video on how not to saw your arm off can be found here.
The next step was to secured a weedex membrane over the buried rubble under the steps, ready for the cat litter to be placed on it.
The final result is shown to the left. You'll notice that the old concrete wall is now clad with 500mm x 500mm decking tiles, secured with wooden battens.
I then gave the whole thing a couple of coats of Cuprinol woodstain.
I've not really got a clue about plants but the ones i've planted haven't died just yet.
I hope you've found this blog useful and that it's provided some inspiration on what was a relatively easy project for not much more than £400 and a bit of wood chopping. Please feel free to leave comments.